Getting your clients into KundPro is the first step to unlocking everything the platform can do — tracking, follow-ups, renewals, and a fully organized book of business. This guide walks you through the entire process from downloading the template to confirming your import.
What You'll Need
The client upload process uses a standard CSV file. KundPro provides a pre-formatted template with all the correct column headers already in place. You fill in your client data, save the file, and import it — that's it.
- Access to KundPro Settings (any beta account)
- Your existing client data — from Excel, another CRM, or a lead list
- A spreadsheet app to fill in the template (Excel, Google Sheets, or Numbers)
If you're evaluating whether KundPro is the right fit, see our guide on what CRM Medicare agents use for a broader comparison.
Step-by-Step: Uploading Your Clients
Go to Settings
From your KundPro dashboard, look at the left sidebar and click Settings. You'll find it near the bottom of the navigation.
⚙️ Settings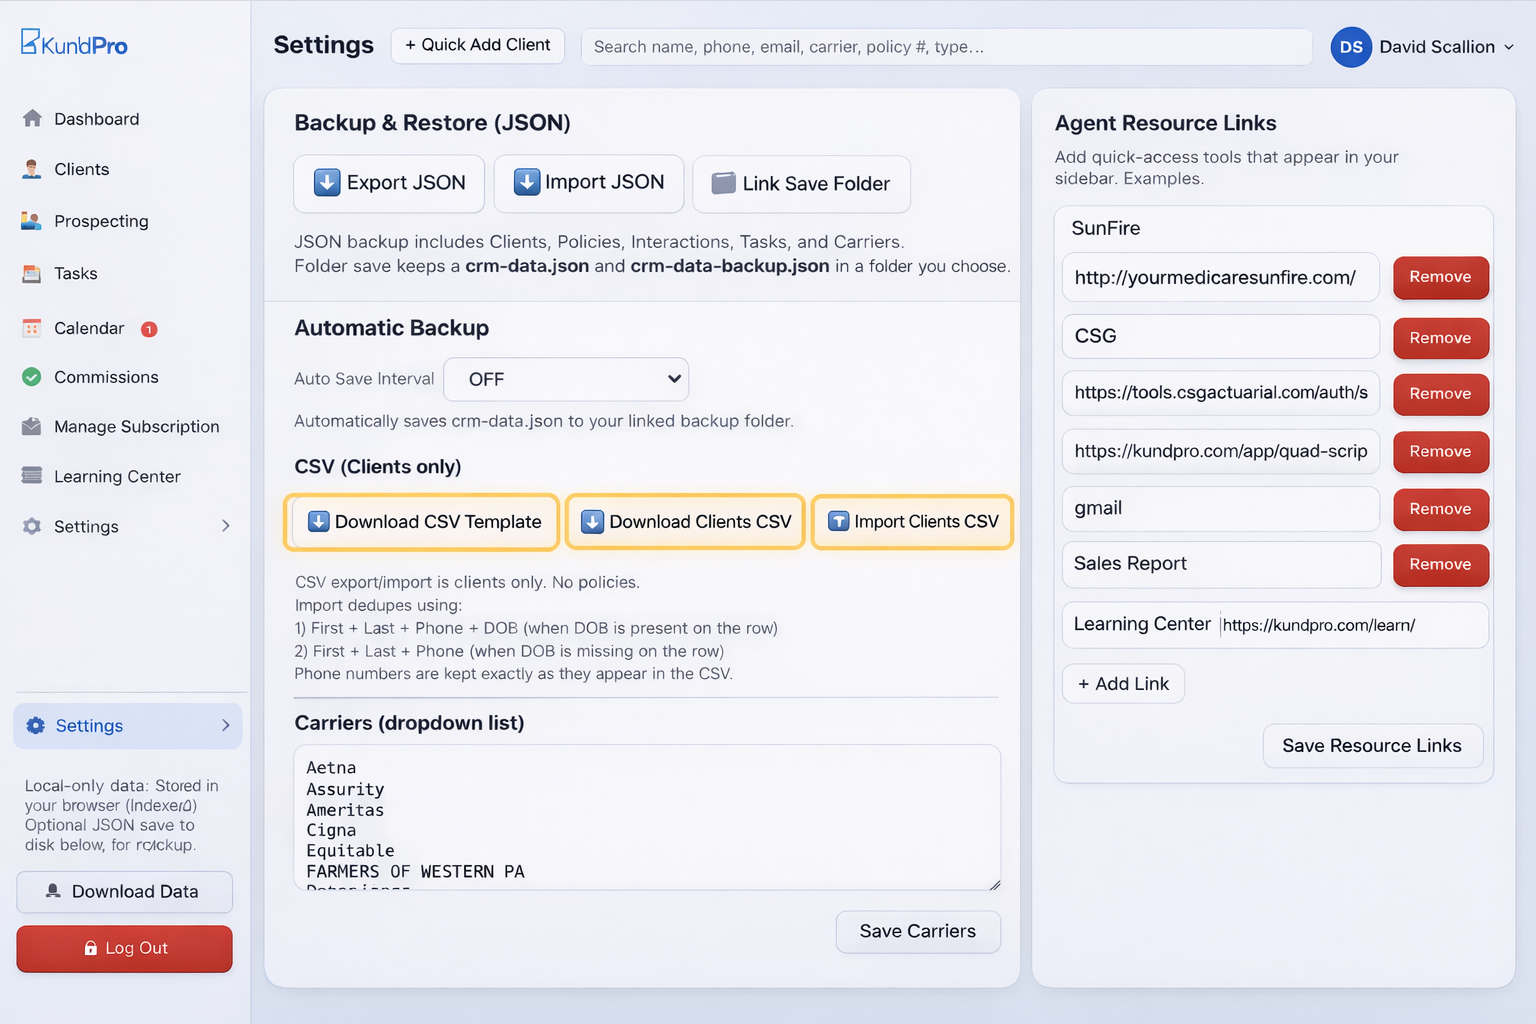
Locate "Backup & Restore (JSON)"
Inside Settings, find the section labeled Backup & Restore (JSON). You'll see three buttons here:
- Download CSV Template — the blank template to fill in
- Download Clients CSV — exports your existing clients as a CSV
- Import Clients CSV — uploads your filled-in CSV file
For this tutorial, we'll be using Download CSV Template and Import Clients CSV.
Download the CSV Template
Click Download CSV Template. This downloads a file called:
Open this file in Excel, Google Sheets, or Numbers. You'll see the column headers already filled in across the top row — do not change them.
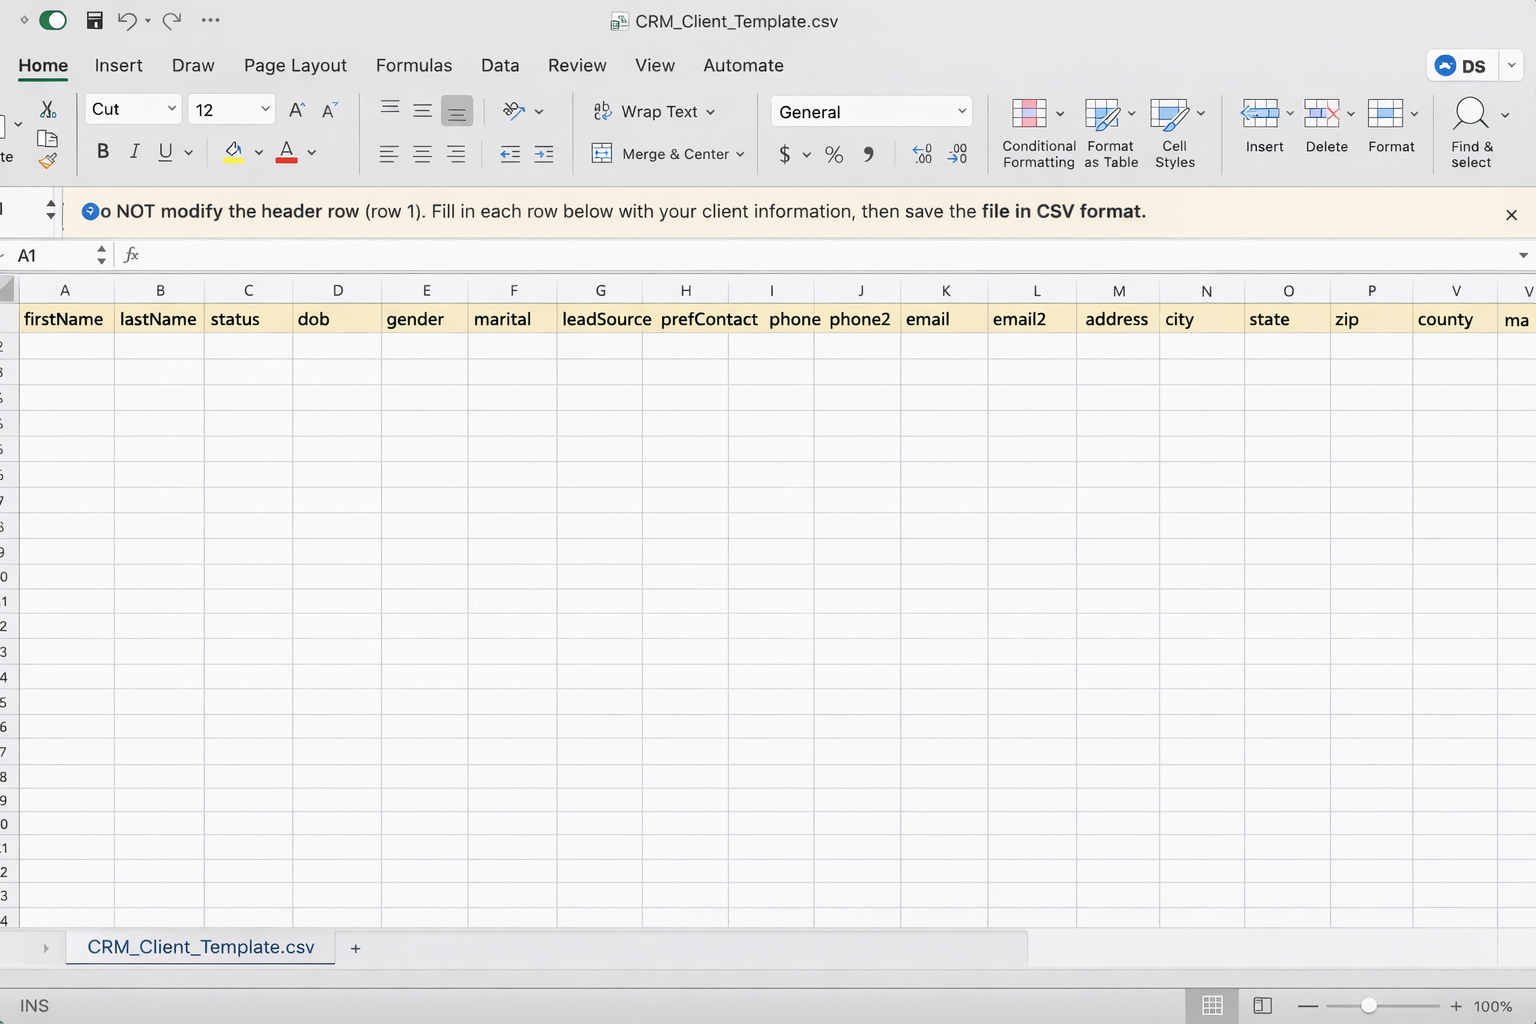
Understand the Required Format
The template includes all the column headers KundPro expects. Do not rename, remove, or reorder these headers — the import tool depends on them being exactly as provided.
The full list of available columns is:
Fill Out Your Client Data
Each row in the spreadsheet represents one client. Start filling in your data below the header row.
✅ Required Fields
Every row must have at minimum:
- firstName — client's first name
- lastName — client's last name
If either of these is missing on a row, that record will not be created during the import.
📌 Optional but Recommended Fields
The more complete your data, the more powerful KundPro becomes. Fill in as many of these as you have:
- phone and phone2 — primary and secondary phone numbers
- email and email2 — email addresses
- address, city, state, zip, county — mailing address
- ma, mb, mbi — Medicare Part A, Part B, and Medicare Beneficiary Identifier
- dob — date of birth
- notes — any general notes about the client
📊 Status Field — Accepted Values Only
If you use the status column, you must use one of these exact values. Custom entries will not be recognized:
Save Your File as CSV
Once you've finished entering your client data, save the file. This step is critical:
- Save as .csv format
- Do not save as Excel format (.xlsx) — the import tool requires CSV
In Excel: File → Save As → CSV (Comma delimited). In Google Sheets: File → Download → Comma Separated Values (.csv).
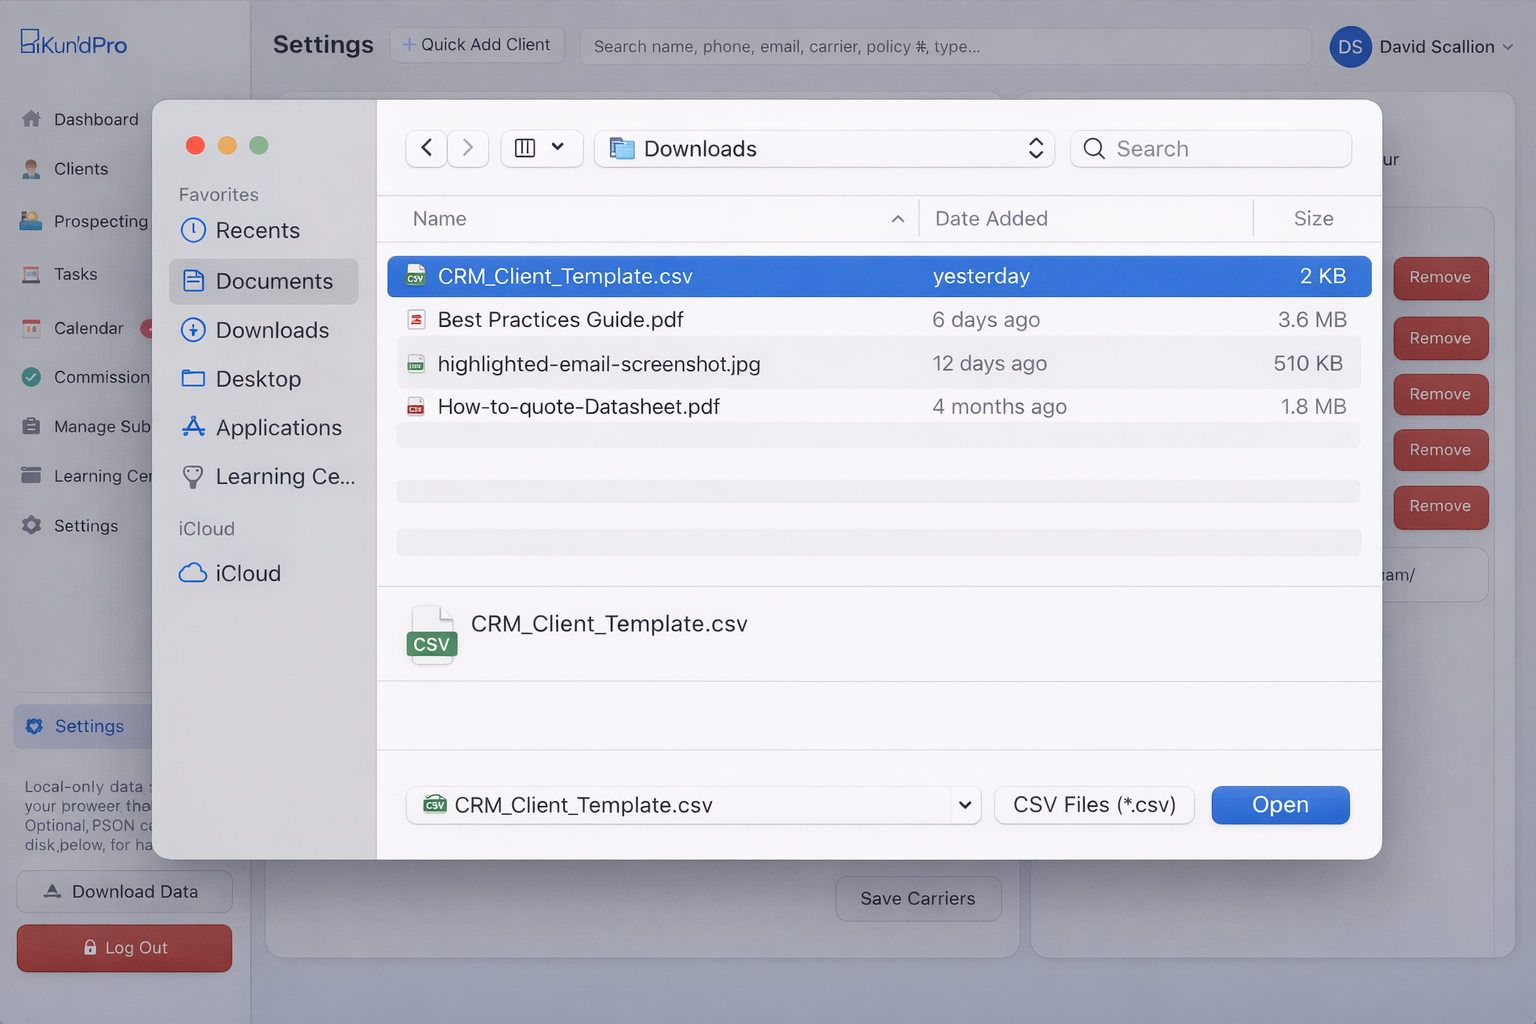
Import Your Clients
Back in KundPro, return to Settings → Backup & Restore (JSON) and:
- Click Import Clients CSV
- A file picker will open — navigate to your saved CSV file
- Select the file and click Open (or Select on Mac)
Confirm the Import
Once your file is selected and uploaded, KundPro will process each row. Your clients will appear in the system shortly after.
If something doesn't look right after importing:
- Return to your CSV file and double-check that the column headers are unchanged
- Make sure every row that should be imported has at least a firstName and lastName
- Confirm the file was saved as .csv and not .xlsx
- Check that the status column only contains accepted values (or is left blank)
Tips for Faster, Cleaner Uploads
Copy & paste from existing data
If you already have client data in Excel, an old CRM export, or a lead list, you don't need to retype anything. Open your existing file alongside the template and copy columns directly across. Match your column names to the template headers and paste the values in.
→ This is the fastest way to import large books of business.Keep the spreadsheet clean
Before saving and importing, make sure your file has no merged cells, no extra columns beyond the template headers, and no formatting tricks like colored rows or formulas in the data cells. Plain, clean data imports most reliably.
Start small if you're unsure
If you have hundreds or thousands of clients and want to confirm everything imports correctly first, start by uploading 5–10 records. Verify those look right inside KundPro, then upload your full list with confidence.
→ A quick test run saves time troubleshooting a large import.What's Coming Next
The current import tool supports client records. Additional import capabilities are planned for future updates:
Policy data import
A future update will allow you to import policy records alongside clients, so you can bring your full book of business — including coverage details — into KundPro in one step.
Flexible field mapping
Planned field mapping will let you upload from any CSV format — not just the KundPro template — by matching your existing column names to KundPro fields. This will make migrating from other CRMs even faster.
What to Do After Uploading
Once your clients are in KundPro, you're set up to take advantage of everything the platform offers. A few good next steps:
Frequently Asked Questions
What file formats does KundPro support?
KundPro supports both CSV and JSON formats. The Backup & Restore section in Settings handles JSON for full data backup and restore. This tutorial covers the CSV client import — the most practical method for bringing in a spreadsheet or CRM export. For the CSV import, make sure your file is saved as .csv and not Excel's .xlsx format.
What are the required fields?
The only required fields are firstName and lastName. Every other field is optional. Rows missing either of these will be skipped during import.
What values are accepted in the status field?
The status field only accepts: Lead, Prospect, Active, Non-Active, and Deceased. Do not use custom values. If you're unsure, leave status blank and update it inside KundPro after importing.
Can I upload clients from an existing CRM or Excel file?
Yes. If you have existing client data in Excel, another CRM, or a lead list, copy and paste it directly into the KundPro CSV template. Match your data to the correct column headers, then save as .csv and import. This is the fastest way to migrate a large book of business.
Can I import policy data?
Currently, KundPro supports client imports only. Policy data import and flexible field mapping are planned for a future update. For now, focus on getting your client records in — policy data can be added manually or updated once those import tools are available.
Can I run the import more than once?
Yes. You can run additional imports at any time to add new clients. It's a good idea to keep your template file updated so future imports are quick.
Your book of business deserves a better home.
KundPro CRM + AMS is built specifically for Medicare agents — now in private beta with founding pricing locked in.
Apply for Beta Access →No credit card required · Free during beta · Medicare agents only
Built by a Medicare agent with over 20 years of real-world experience.